Battery switch on travel trailer function is crucial for managing your RV’s power. Understanding how your battery switch works is key to preventing dead batteries and ensuring your appliances function correctly. This guide will walk you through the different types of switches, their locations, operation, troubleshooting, and maintenance – everything you need to know to become a battery switch pro!
We’ll cover everything from the simple single-pole switch to more complex dual-battery systems, explaining the advantages and disadvantages of each. We’ll also show you where to find your switch, how to use it safely, and what to do if you encounter problems. Get ready to master your travel trailer’s power system!
Battery Switch Types in Travel Trailers
Choosing the right battery switch for your travel trailer is crucial for managing your power sources effectively and preventing electrical issues. Understanding the different types available and their functionalities will help you make an informed decision based on your specific needs. This section will detail the common types, their pros and cons, and how they compare.
Single-Pole Battery Switches
Single-pole battery switches are the simplest type. They control the power flow from a single battery to the trailer’s electrical system. They typically have an “on” and “off” position. This is a good option if you only have one battery in your setup. The advantage is their simplicity and low cost.
However, they lack the ability to isolate batteries or switch between them, limiting their functionality for those with multiple batteries. A common issue is that if a problem arises with the battery, you can’t easily isolate it without disconnecting cables.
Double-Pole Battery Switches, Battery switch on travel trailer function
Double-pole battery switches offer more control than single-pole switches. They allow you to connect and disconnect two batteries independently, offering more flexibility. This is useful for managing two house batteries or a house battery and a starting battery. You can charge both batteries simultaneously or individually, and isolate a faulty battery from the system to prevent damage. They offer better protection and control compared to single-pole switches, but they are slightly more complex to install and operate.
So, you’re planning a trip? Awesome! First things first: get travel insurance. Check out Aon travel insurance for solid coverage. Then, if you’re an audiophile like me, don’t forget your tunes! Planning your audiophile travel setup beforehand is key to enjoying your favorite music on the go. Make sure you pack appropriately and have backups for your precious gear!
Dual Battery Switches (with Isolation)
Dual battery switches, often incorporating an isolation feature, are designed for systems with two batteries. These switches typically have three positions: “Both,” “Battery 1,” and “Battery 2.” The “Both” position connects both batteries to the trailer’s system, ideal for high-power demands. The “Battery 1” and “Battery 2” positions allow you to use only one battery at a time, useful for conserving power or isolating a problem.
The isolation feature is key; it prevents backfeeding from one battery to another, protecting both batteries and preventing accidental discharges.
Comparison of Battery Switch Types
The following table summarizes the key features of the different battery switch types:
| Feature | Single-Pole | Double-Pole | Dual Battery (with Isolation) |
|---|---|---|---|
| Number of Batteries Supported | 1 | 2 (independent control) | 2 (with isolation) |
| Isolation Capability | No | Partial (each battery can be disconnected) | Yes (complete isolation between batteries) |
| Complexity | Low | Medium | Medium |
| Cost | Low | Medium | Medium to High |
Battery Switch Location and Accessibility
Finding your travel trailer’s battery switch quickly and easily is crucial, especially in emergencies or when troubleshooting electrical problems. A poorly located switch can lead to frustration and delays, potentially impacting your camping experience. The ideal location balances ease of access with safety considerations.The most common locations for battery switches in travel trailers are near the battery itself, often within a dedicated battery compartment, or inside a readily accessible exterior compartment, sometimes near the tongue.
Less common, but still possible, are interior locations, though this is generally less desirable due to safety concerns. Accessibility varies greatly depending on the manufacturer and model of the trailer. Some switches are easily visible and reachable, while others may be tucked away in tight spaces, requiring tools or contortions to access.
Typical Battery Switch Locations and Accessibility Issues
The location of the battery switch significantly affects maintenance and troubleshooting. A switch located within a cramped battery compartment, for example, makes simple tasks like turning the switch on or off more difficult. This is especially problematic in older trailers where corrosion or damage to the wiring might require inspection. Similarly, a switch hidden beneath a cluttered storage area or behind other equipment can delay troubleshooting efforts when electrical problems arise.
Easy access is paramount for quickly disconnecting the battery in case of an emergency or for performing routine maintenance checks.
Best Practices for Ensuring Easy Access
To ensure easy access to your battery switch, consider these best practices. First, regularly inspect the switch and surrounding area for any signs of corrosion, damage, or loose connections. Second, keep the area around the switch clear of obstructions. Third, if your switch is difficult to reach, consider adding easily accessible labels or markings to help locate it quickly.
Fourth, if possible, choose a campsite with adequate lighting to facilitate easier access at night. Finally, for switches located in difficult-to-reach places, consider using a longer handle or extension to improve accessibility.
Ideal Battery Switch Location: A Visual Description
Imagine a battery switch located in a clearly marked, weatherproof compartment easily accessible from the outside of the trailer, near but not directly on top of the battery itself. The compartment should be large enough to allow for comfortable access to the switch without needing to reach or contort awkwardly. The switch itself should be clearly labeled, perhaps with an illuminated indicator to show its status, and easily manipulated, even while wearing gloves.
The compartment should also be well-ventilated to prevent the buildup of potentially explosive gases. This design prioritizes both safety and ease of access, making maintenance and troubleshooting a straightforward task.
Operating the Battery Switch
Safely operating your travel trailer’s battery switch is crucial for maintaining your RV’s electrical system and preventing potential damage or hazards. Understanding the switch’s functions and following proper procedures will ensure a smooth and safe camping experience. This section details the step-by-step process for operating the switch, explains the significance of each switch position, and Artikels important safety precautions.
Battery Switch Operation Procedure
Before you begin any work with your RV’s electrical system, always ensure the engine is off and the main power breaker is turned off. This will prevent accidental short circuits and potential injuries. The following steps provide a safe and effective way to operate your battery switch:
- Locate the Battery Switch: First, find your travel trailer’s battery switch. Its location varies depending on the RV’s make and model, but it’s often found near the battery itself, inside a compartment, or in a central electrical panel. Consult your RV’s owner’s manual if you’re unsure of its location.
- Identify Switch Positions: Most battery switches have three positions: “Off,” “Battery,” and “Both.” “Off” completely disconnects the battery from the trailer’s electrical system. “Battery” connects only the trailer’s house battery to the system. “Both” connects both the house battery and the starting battery (if your setup has one) to the system.
- Turn the Switch to the Desired Position: Carefully turn the switch to the position you need. If you’re preparing to leave the campsite, turn it to “Off” to prevent battery drain. If you’re using the RV’s appliances, turn it to “Battery” or “Both” depending on your needs. Always double-check the switch’s position to ensure it’s correctly set.
- Monitor Battery Levels: Regardless of the switch position, regularly monitor your battery levels to prevent deep discharge. This is particularly important during extended periods of non-use.
Understanding Switch Positions and Their Effects
The position of your battery switch directly impacts your travel trailer’s power supply. The “Off” position provides complete isolation, preventing battery drain when the RV is not in use. The “Battery” position powers only the house battery, which runs the interior lights, appliances, and other 12V systems. The “Both” position supplies power from both the house and starting batteries, providing more power for extended use or demanding appliances.
Incorrect use can lead to dead batteries or damage to electrical components.
Safety Precautions When Handling the Battery Switch
Working with batteries and electrical systems always carries inherent risks. Always prioritize safety by following these precautions:
- Wear appropriate safety glasses to protect your eyes from potential splashes or sparks.
- Use insulated tools to prevent accidental shocks.
- Never work on the electrical system in wet or damp conditions.
- Ensure good ventilation to avoid exposure to potentially harmful battery gases.
- If you are unsure about any aspect of operating the battery switch or performing any electrical work on your RV, consult a qualified technician.
Troubleshooting Common Battery Switch Issues

Dealing with a faulty battery switch in your travel trailer can be frustrating, leaving you without power when you need it most. Understanding common problems and how to troubleshoot them can save you time, money, and a lot of frustration. This section Artikels common issues and provides step-by-step guidance to get your battery switch working again.
Identifying Common Battery Switch Problems
Several issues can arise with your travel trailer’s battery switch. The most frequent problems include a complete lack of power to the trailer’s 12V system, inconsistent power (intermittent operation), or the inability to switch between battery banks (if applicable). These problems often stem from simple issues like loose connections or corroded terminals, but more complex wiring faults are also possible.
Troubleshooting Steps for No Power
If you have no power at all from your battery switch, the first step is a visual inspection. Check the switch itself for any obvious signs of damage, such as cracks or burn marks. Next, examine all connections to the switch – both the battery cables and any wiring leading to the trailer’s electrical system. Look for loose connections, corrosion on the terminals, or broken wires.
Clean any corroded terminals with a wire brush and tighten any loose connections. If you find a broken wire, carefully repair it using appropriate connectors and electrical tape. If the problem persists, you may need to trace the wiring back to the battery to ensure the battery itself is functioning correctly and is properly connected.
Troubleshooting Steps for Inconsistent Power
Intermittent power suggests a more subtle problem. Start by carefully inspecting all connections for loose or corroded areas, paying particular attention to the points where the battery cables connect to the switch and the switch connects to the trailer’s wiring harness. A slightly loose connection can make intermittent contact, leading to inconsistent power. Jiggle the connections gently while testing the power; if the power fluctuates, this confirms a loose connection.
Another potential culprit is a faulty switch itself. A multimeter can test the continuity of the switch; if it doesn’t consistently show continuity when switched on, the switch needs replacing. Finally, inspect the wiring harness for any signs of damage or wear that could be causing intermittent shorts.
Diagnosing Wiring, Connections, and Switch Issues
A systematic approach is key to effective diagnosis. Begin with a visual inspection of the entire system. Check the battery terminals for corrosion and ensure they are securely fastened. Trace the wiring from the battery to the switch, then from the switch to the main power distribution panel of the trailer. Look for any breaks, frayed insulation, or signs of overheating.
Use a multimeter to test voltage at various points along the circuit. Check the voltage at the battery terminals, then at the input and output terminals of the switch, and finally at the main power distribution panel. Any significant voltage drop between points indicates a problem with the wiring or connections in that section. If the voltage is correct at the battery and switch input but low or absent at the switch output, the switch itself is likely faulty.
Troubleshooting Flowchart: No Power from Battery Switch
This flowchart Artikels a basic troubleshooting process for a common battery switch problem (no power).[Imagine a flowchart here. It would start with a box labeled “No Power from Battery Switch?” A “Yes” branch would lead to a box labeled “Visual Inspection of Switch and Connections,” with branches leading to “Loose/Corroded Connections?” (Yes/No). A “Yes” would lead to “Clean/Tighten Connections,” then back to “No Power?” for retesting.
A “No” would lead to “Check Battery Voltage,” then to “Check Wiring Continuity with Multimeter,” and finally to “Replace Switch (if necessary).” A “No” branch from the initial question would indicate a different problem requiring different troubleshooting.]
Battery Switch Maintenance and Replacement
Keeping your travel trailer’s battery switch in good working order is crucial for reliable power. Regular maintenance prevents problems and extends the life of the switch, saving you from unexpected breakdowns and costly repairs. Neglecting maintenance can lead to corrosion, poor connections, and ultimately, switch failure.
So, you’re planning a trip? Awesome! First things first: get yourself sorted with travel insurance. Check out Aon travel insurance for some solid options; they’ve got you covered. Then, if you’re an audiophile like me, don’t forget your tunes! Planning your audiophile travel setup beforehand is key for a truly enjoyable trip.
Seriously, good sound makes all the difference when you’re exploring new places.
Routine Maintenance Schedule
A simple maintenance schedule can significantly prolong the lifespan of your battery switch. It’s recommended to inspect your battery switch at least twice a year, especially before and after extended periods of storage. A more thorough inspection, including cleaning, should be performed annually, or more frequently if you notice any signs of corrosion or damage. For those in particularly harsh climates (extreme heat, cold, or high humidity), more frequent checks might be advisable.
Cleaning and Inspecting the Battery Switch
Before beginning any maintenance, always disconnect the battery’s negative terminal to prevent accidental shocks. Use a wire brush or sandpaper to clean any corrosion from the battery terminals and the switch terminals. Pay close attention to the connection points, removing any built-up white or green residue. A baking soda and water paste can help neutralize any acid buildup.
After cleaning, apply a dielectric grease to the terminals to prevent future corrosion and improve conductivity. Visually inspect the switch itself for any signs of damage, such as cracks, loose components, or overheating. Ensure the switch operates smoothly and makes a firm connection.
Signs of a Faulty Battery Switch
Several indicators suggest your battery switch needs replacing. Intermittent power to your appliances or lights is a common sign. Difficulty turning the switch on or off, or a switch that feels loose or wobbly, also indicates a problem. If you notice excessive heat around the switch during operation, this is a serious warning sign and necessitates immediate attention.
Visible corrosion that is resistant to cleaning, or damage to the switch housing itself, also calls for replacement. A consistently weak battery charge, even with fully charged batteries, could be attributed to a failing switch.
Replacing a Faulty Battery Switch
Replacing a battery switch requires basic tools and some electrical knowledge. You will need a screwdriver (likely a Phillips head), a wire brush or sandpaper, dielectric grease, and a replacement switch that matches the amperage rating of your system. Before starting, disconnect the negative battery terminal. Carefully remove the wires connected to the switch, noting their positions for correct reconnection.
Unscrew the switch from its mounting location. Install the new switch, ensuring it is securely fastened. Reconnect the wires in their original positions, applying dielectric grease to the terminals. Reconnect the negative battery terminal and test the switch. Remember to always consult your travel trailer’s wiring diagram if you are unsure about any connections.
Improper wiring can lead to damage or even fire.
Impact of Battery Switch on Travel Trailer Systems: Battery Switch On Travel Trailer Function
Your travel trailer’s battery switch is the central control for power distribution, acting as a gatekeeper for your 12-volt DC systems. Understanding its function is crucial for safe and efficient operation of your RV. This section details how the switch affects various systems and manages power flow between your batteries.The battery switch controls the flow of power from your house batteries (used for lights, appliances, and water pump) and your starting battery (dedicated to starting your vehicle’s engine).
The switch’s position dictates which batteries are connected to your trailer’s electrical system and how power is distributed. Improper use can lead to dead batteries or malfunctioning systems.
Power Distribution Between House and Starting Batteries
The primary function of the battery switch is to isolate or connect the house batteries and the starting battery. In the “off” position, both batteries are disconnected from the trailer’s electrical system, preventing accidental discharge. In the “house” position, only the house batteries power the 12V systems. The “both” or “start” position connects both batteries, providing additional power for demanding situations, but potentially draining the starting battery if not managed carefully.
The “start” position is typically used to boost the starting battery if it’s low.
Influence of Switch Positions on Power Supply
Different switch positions result in distinct power scenarios:
| Switch Position | House Battery | Starting Battery | 12V Systems |
|---|---|---|---|
| Off | Disconnected | Disconnected | No Power |
| House | Connected | Disconnected | Powered by House Battery |
| Both/Start | Connected | Connected | Powered by Both Batteries |
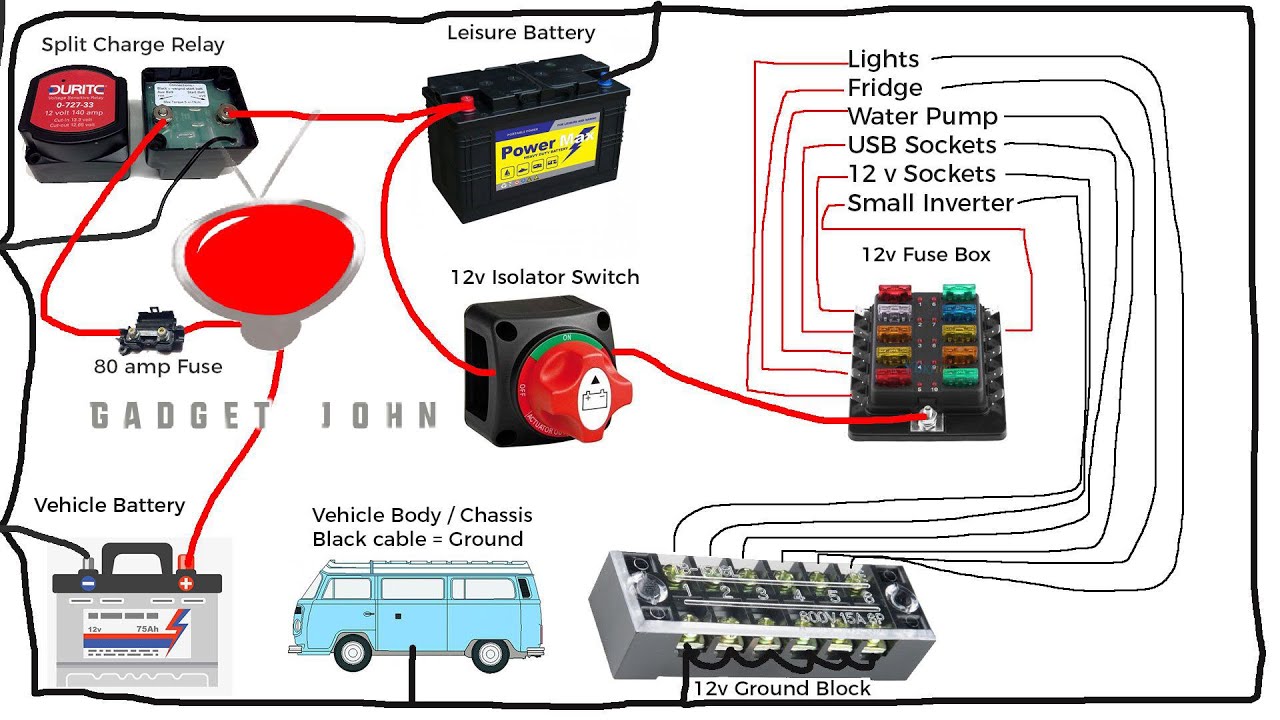
Diagram of Power Flow Through the Battery Switch
Imagine a simple diagram. Two batteries are depicted, one labeled “House Batteries” and the other “Starting Battery.” A three-position switch sits between them and a branching set of wires leading to various systems (lights, water pump, furnace fan, etc.).* Off Position: The switch is depicted in a position where no connection is made to either battery. The lines leading to the 12V systems are not energized.* House Position: The switch connects only the “House Batteries” to the 12V systems.
The starting battery remains isolated. Power flows from the house batteries to the various systems.* Both/Start Position: The switch connects both the “House Batteries” and the “Starting Battery” to the 12V systems. Power flows from both batteries to the systems, providing a combined power source.
Mastering your travel trailer’s battery switch is a simple yet rewarding skill. By understanding the different types of switches, their operation, and potential problems, you’ll be well-equipped to handle any power-related issues that arise. Regular maintenance and careful operation will ensure your RV’s electrical system remains reliable, keeping your lights on and your appliances running smoothly throughout your adventures.
Happy travels!
Popular Questions
What happens if I leave my battery switch in the “off” position?
Leaving the switch off completely disconnects power to all house batteries, preventing any drain. However, it also means you won’t have power to any appliances or lights running off the house batteries.
Can I use a battery switch to charge both batteries simultaneously?
Yes, many switches allow charging both batteries simultaneously. Check your specific switch’s manual for instructions.
My battery switch is making a clicking sound. What’s wrong?
A clicking sound often indicates a problem with the switch itself, a loose connection, or a low battery. Check connections and test the battery voltage.
How often should I clean my battery switch?
Inspect and clean your battery switch at least once a year, or more frequently in dusty or humid environments. Use a wire brush and deoxidizing spray to clean terminals.
